Tutorial: Getting Started With UISpec on XCode 4
This is a Quick Start Guide that shows how to get you started with Acceptance Test Driven Development for the iPhone, usingUISpec and XCode 4.0. (There’s also an XCode 3-version of this tutorial.)
The following were used in the creation of this tutorial:
- XCode 4.0
- iOS SDK 4.3
- UISpec version 1.1 (subversion revision 82)
Suggestions on how to improve this guide are much welcome, in which case you can use the comment form at the end of this page.
Step 1: Create a New XCode Project
- Start XCode and create a new View-based Application project.

- Name the product HelloUISpec, and give it a company identifier. If you’re not planning on using the built in OCTest for your unit testing you should uncheck the Include Unit Tests checkbox. In this tutorial I’ll leave it checked.

- Create a new folder called Code in your home directory, make sure it’s selected and click the Create button. XCode will create a project folder named HelloUISpec under the Code folder.

- Set iPhone 4.3 Simulator as the active Scheme, then Run the empty application to make sure the new project was set up correctly.
If nothing went wrong the simulator window should be displayed. You may then close it (using cmd-Q).

Step 2: Install UISpec
- Open a Terminal Window and navigate to the Code directory:
cd ~/Code - Checkout the UISpec code from subversion with this command:
svn co http://uispec.googlecode.com/svn/trunk/ UISpec

- Close the Terminal Window and go back to XCode.
- Create a new target for your acceptance tests by right clicking the HelloUISpec target, and choose Duplicate in the context menu.

- Click the Duplicate only button on the following dialog.

- Change the name of the new target, from “HelloUISpec copy” to “HelloUISpecAcceptanceTests”
- Change the Product Name setting (for the new target) to HelloUISpecAcceptanceTests. The Product Name setting is found on the Build Settings tab, under the Packaging section.

- Change the name of the HelloUISpec copy scheme to HelloUISpecAcceptanceTests by clicking on the Scheme control on the tool bar, selecting Manage Schemes… from the context menu.


- Add a reference to the UISpec project by right clicking HelloUISpec (the root node in your project) and choosing Add Files to “HelloUISpec”…

In the dialog shown, navigate to ~/Code/UISpec/XCode/UISpec and select the file UISpec.xcodeproj. Make sure that only the HelloUISpecAcceptanceTest checkbox is checked, and click Add.

- Add a direct dependency to UISpec by selecting the HelloUISpecAcceptanceTests, go to the Build Phases page, expand the Target Dependencies section, click on the plus (+) button.

- Add a dependency to UISpecs static library by expanding the Link Binary With Libraries section on the Build Phases pane, select the libUISpec.a node and click Add.

- Add the path to UISpec header files by selecting the HelloUISpecAcceptanceTests target node, on the Build Settings pane, change the value of Header Search Paths to UISpec’s headers directory:~/Code/UISpec/headers
Note! In order to find the Header Search Paths property, you’ll need to change filter mode from Basic to All in the upper left corner of the pane.
As a tip, an easy way to find Header Search Paths in the list of settings is to use the search control.
- Add the RUN_ACCEPTANCE_TESTS define to both the Debug and the Release version of the Preprocessor Macros build setting (which you’ll find in the GCC 4.2 – Preprocessing section).

- Replace the project’s main.m file with the following code:
#import <UIKit/UIKit.h>
#ifdef RUN_ACCEPTANCE_TESTS
#import "UISpec.h"
#endif

int main(int argc, char *argv[]) {
NSAutoreleasePool * pool = [[NSAutoreleasePool alloc] init];

#ifdef RUN_ACCEPTANCE_TESTS
  [UISpec runSpecsAfterDelay:3];
#endif

  int retVal = UIApplicationMain(argc, argv, nil, nil);
  [pool release];
  return retVal;
}
- Change the active scheme to HelloUISpecAcceptanceTests iPhone 4.3 Simulator.

As you can see, XCode has added a couple of new schemes (UISpec and Specs). You may want to remove these in the Manage Schemes… dialog. - Build and Run.
Now, your project is ready for the next step, which, if you’re a good TDD practitioner, is to write a failing acceptance test.
Step 3: Write a Failing Test
- Add a new group to your project by right clicking the project root node (HelloUISpec) and selecting New Group.
Name the new group “Acceptance Test Cases”.

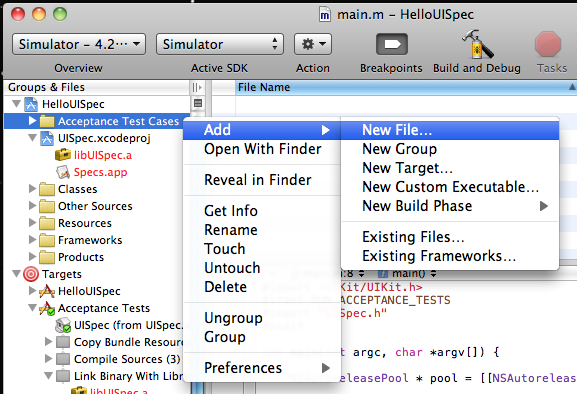
- Add a new test case file by right clicking the new “Acceptance Test Cases” group and selecting Add/New File…

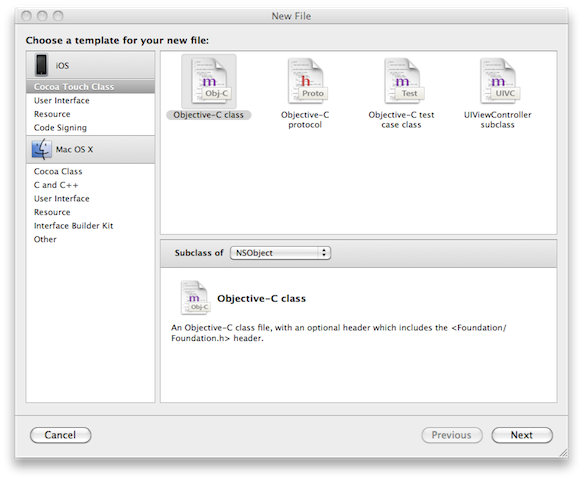
Select the Objective-C class template and click Next.

Leave NSObject as the type of Subclass.

Enter DescribeHelloWorld as the name and make sure Acceptance Tests is the only designated target.

- Delete the DescribeHelloWorld.h file that XCode automatically created for you in the Acceptance Test Cases group.
- Replace the content of DescribeHelloWorld.m with the following code:
#import	"UISpec.h"
#import "UIQuery.h"

@interface DescribeHelloWorld: NSObject <UISpec> {
}
@end

@implementation DescribeHelloWorld

-(void)itShouldSayHelloWorld {
	UIQuery *app = [UIQuery withApplication];
	[expectThat([app.label text:@"Hello World!"]) should].exist;
}
@end
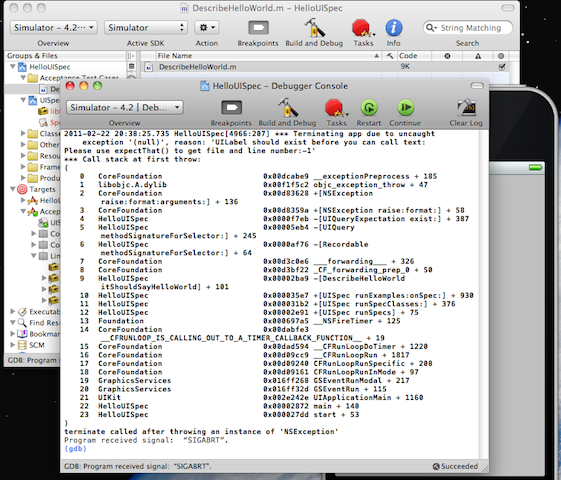
- Hit the Build and Run button and keep an eye on the Debug Console. The program halts on an exception and the message in the debug view is ugly, but what it tells us indirectly is that no label was found within the application.

Now it’s time to make the test pass.
Step 4: Make the Test Pass
- Start Interface Builder by selecting the file HelloUISpecViewController.xib under the HelloUISpec file group.

- Bring out the utilities window by using the View control on the tool bar, or by using the View|Utilities|Show Utilities from the application menu.

Select the Object library in the bottom part of the utilities window.

Find the Label control in the list of objects (hint: use the search field) and add a new label by dragging and dropping onto the view. Change the text of the label to read “Hello World!”.

- Hit the Build and Run button and keep an eye on the Debug Console. It should now show a message that informs us that there were no failures.

Hi,
I want to know whether this UISpec can be used for ipad application testing as well..
Regards,
Malju.
Although I haven’t tried it myself, UISpec should be able to handle Ipad application testing as well.
Excellent article! Thanks very much for this, I’ve spent a lot of time trying to get full application testing to work on iOS devices.
UI Automation Instrument was of no use as it does not allow you to invoke class methods on the original code as it is JavaScript based. The Cocoa Touch Unit Testing, Xcode 4 ships with, has no support for asynchronous events so this means the UI thread gets blocked. Lastly I tried GHUnit, but that was just too much of a pain to set up and I’m not entirely sure it supports application testing as it is designed to be a unit testing framework.
However I think UISpec may be the solution! I’ll give this a go.
Thank you Sbm,
let me know how it works out with UISpec.
Thanks for the detailed instruction!
I’m a test neophyte so this article is *critical* for me to understand how UISpec fits into reality, as in ‘implementation’ vs another abstraction. I’ll contribute what I can once I get off the ground with some coding & test flight. The whole automated testing scenario is becoming fascinating to me.
I would like to more such detail articles on the use of Cucumber & ‘Frank’ as in ‘Frankinstein’… an integrated test automation project.
Again, thank you.
Am I the only one getting an Project /Applications/uispec-read-only/xcode/UISpec/UISpec.xcodeproj cannot be opened because it is missing its project.pbxproj file when trying to open UISpec.xcodeproj on XCode 4 or 4.1?
Hans-Eric, does the latest code actually work in XCode 4? I’d love to use UISpec but I can’t seem to get it to work…
I am not an XCode expert, so I might be missing something obvious…
Thanks
Yes,it’s good tutorial…I followed the steps it works fine for me but my debug console show me the result up to “Attaching process..” and not showing status of pass or failure.
help me to solve the problem.
how can i test external .app / .ipa using uispec in xcode??
Hi Hans-Eric. Thanks for taking the time to write and update this, but it no longer appears to work (in the latest XCode 4 or in XCode 5 DP6). Specifically, when writing the first failing test there are two errors in the expectation:
Bad receiver type ‘void’
No visible @interface for ‘UIQuery’ declares the selector ‘text:’
That second error actually appears twice for that line of code. Has the UISpec interface changed since your rewrite, perhaps?
Any help you can offer is appreciated. Thanks.